A r t i c l e s A n d C a s e
S t u d i e s
How To Sharpen Your Hoof Knife
by Glenn Ramsey
Something that I get asked a lot is how do you get your hoof
knife sharp and
how do you keep
it that way.
The short answer is the best angle for the cutting edge on most hoof knives is
about 20 degrees. If you are experienced with sharpening knives then is all the
the information you'll need; read no further.
The right angle for the edge
Many hoof knifes, as supplied, have the wrong bevel on the edge and the first time they are sharpened will require extra effort, but once the knife has the right edge angle it is easy to keep it that way.
I have found that the best angle to provide a sharp edge that stays sharp and is easy to retouch is around 20 degrees.
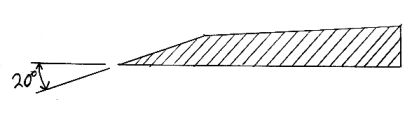
In the diagram this angle appears to be very shallow, well it is. The shallower the angle on the knife, the easier it will be to control, a too steep angle may cause the knife to be hard to control and it may dig into the hoof, a too shallow angle will cause the edge dull quickly and it may bend or chip.
Choosing a sharpener
There are several different types of sharpener available, I'll discuss a few of
the more common types.
File
A file, even the finest, will usually be too course for sharpening and will remove too much metal if used often, shortening the life of the knife. A file is most useful for putting the right bevel on a new knife or fixing the edge if you happen to drop the knife on concrete or you accidentally run into a stone embedded in a hoof.
Scraper
These have a square edged piece of tool steel in a handle and a with a bit of practice are very effective. You can however take off a lot of metal if you use too much pressure. The correct way to use this type of sharpener is to
make very light strokes.
Ceramic grit sharpener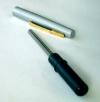
This pen style sharpener is the most versatile type of sharpener and is what I use for touch ups between feet. It can also be used for shaping the edge but since it has a very fine grit it takes a while. If you can only afford one sharpener one of these would be a good choice and they are also pretty cheap. Another similar sharpener has a grit covered oval profile, these are also very effective but are much more expensive.
Sharpening
Holding the sharpener at the correct angle relative to the knife blade is the most important thing. If this is correct then any stroking technique will get the knife sharp enough.
In order to estimate an angle of 20 degrees think of it as just smaller than 1/4 of 90 degrees. Visualise it by holding your sharpener perpendicular to the knife blade then half the angle, halve it again and make it a fraction shallower than that.
With a bit of practice you should get to where you can feel the right angle by the way the sharpener feels as you stroke it along the blade.
Step 1 The hook
Sharpen the hook by stroking the sharpener along the edge away from the knife handle and toward into hook. It
is important that you hold the sharpener at an angle of 20 degrees the whole way around the hook.
Getting this right is the hardest part because you have to move the sharpener in 3 directions at once.
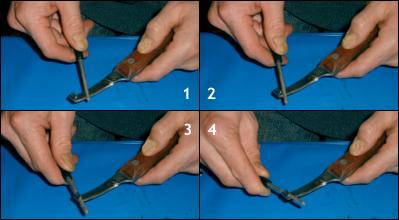
The direction of the stroke is both along the blade and across the edge. The handle of the sharpener is
closer to the blade at the end of the stroke than at the beginning and it starts above the plane of the blade
but, because I'm following the contour of the hook and keeping it at the same angle all the way around the
hook, it ends ends below the plane of the blade.
To make it easier to take the pictures I have chosen to hold the knife edge away from me and I am pushing the
sharpener. Some people might find it easier to point the hook toward themselves and pull the sharpener.
Step 2 The front of the blade
Sharpen the blade by making strokes toward the handle.
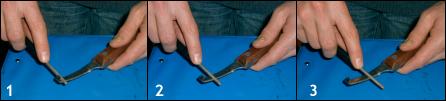
Again the direction of the stroke is both along the blade and across the edge. The reason for going toward
the handle is that the grit on the sharpener will leave microscopic serrations on the edge and the knife
will slice easier if these are angled toward the handle. If you find it easier to stroke from the handle
to the hook then do it that way but finish off the job with a couple of light strokes toward the handle.
Step 3 The back of the blade
The back of the blade does not need to sharpened but you may find that a bur develops. Remove the bur and
then go back and finish the front edge with a couple of light strokes.
How much pressure should you use?
That depends on what you are trying to achieve, more pressure will take off more metal. To finish the edge
the strokes should be light, light enough that you don't need to hold the knife firmly against something.
To create the edge angle or fix a ding you'd use more pressure and will probably need to hold the knife
firmly against something.
To remove a lot of material a circular motion is quite effective. If you are doing this then it helps to
lubricate the sharpener. The ideal lubricant is a very light mineral oil, but water or saliva works just as
well and the thing with saliva is that it's always available!
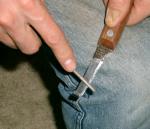
Learning the feel
After you have sharpened your knife a few dozen times you should be able to feel when the angle is right and
tell when it is sharp by what the sharpener feels like as you stroke the blade. But until you can it may help
to colour in the edge with a marker pen. Make a couple of strokes with the sharpener, the ink will come off the
area you touched with the sharpener and you'll be able to see if you are getting the part of the blade that
you thought you were.
Tips for keeping your knife sharp
Don't let it get blunt. This may seem like a stupid comment, but I say this because it is much easier to give
it a small touch up after each hoof or few hooves, and keep it sharp than to let it get really blunt and have
to start from the beginning each time.
Make sure that each hoof is very clean before you start trimming. Use a hoof pick, followed by a stiff brush
if it is dry. If it is wet you might need to wipe of the remaining mud with a rag. Dirt and sand will make
your knife blunt very quickly.
Keep it dry. While most knives are made from a type of stainless steel, they will still rust if left wet.
If your knife is wet, dry it off with a rag before you put it away in its pouch.
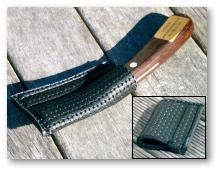
Always keep your knife in a pocket or pouch. This applies while trimming and when storing the knife.
Don't put it on the ground, use the pockets on your apron, and don't put it in your gear bag to rattle
around with all the other stuff in there.
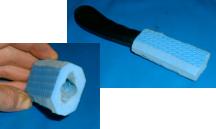
Bladecovers
The blade cover on the left is made from a piece of firm plastic foam. I think
it was left over from making a spa pool cover. I just drilled a 12mm hole down
the centre. The other blade cover is made from girth guard material, which is
tough yet pliable. This one is available from the Natural Hoof shop for NZ$3.40.
Copyright © Glenn Ramsey 2002
Disclaimer: Natural Hoof
reserves the right to change or edit any part of
all articles and case studies submitted to this
website. Natural Hoof does not take any
responsibility for the content of any articles
and/or case studies and/or any misapplication of the information presented in any articles. Natural Hoof presumes readers consult a professional for more information about any topic covered in any Natural Hoof article.
Home | Articles | Study Groups | Clinics-Events | Brag | Classifieds |
Order | Links


|